
Overview #
This document describes how Codebeamer can be set up to connect with IQNECT for semantic search, lifecycle intelligence, and cross-system traceability. Generally, these steps need to be completed for a successful setup:
- Environment discovery, prerequisites, and network readiness.
- Prepare the IQNECT tenant and Codebeamer system entry so the required IQNECT credentials can be generated.
- Install the IQNECT Codebeamer extension in the Codebeamer server.
- Configure Codebeamer application settings for IQNECT, including delegated authorization and optional tunnel settings.
- Return to IQNECT to complete the Codebeamer system connection, including delegated user connection and the integration user used for indexing.
As of IQNECT 26.2.1, the IQNECT widget communicates with the IQNECT backend, and IQNECT reaches Codebeamer on behalf of the user by using delegated authorization. Indexing also changed in 26.2.1: the extension sends metadata and IQNECT fetches the full item contents by using the configured integration user.
The extension is installed inside your Codebeamer environment and provides the backend endpoints, delegated authorization entry point, and frontend bootstrap injection used by IQNECT.
Implementation checklist #
Before the technical installation starts, align the customer-side and IQNECT-side setup activities below.
- The customer sets up the SSO application in their identity provider and provides the required information to IQNECT. See the SSO configuration documentation.
- The customer provides the URL of the Codebeamer instance. Even if the instance is behind a firewall, the FQDN is still needed.
- The customer confirms that Codebeamer Content Security Policy configuration is complete and that
https://app.iqnect.aiis whitelisted. See the PTC Help Center Content Security Policy guidance. - The customer confirms that the IQNECT networking requirements are fulfilled.
- The customer identifies the projects and trackers that should be continuously analyzed and ensures the integration user can access them.
- The IQNECT administrator creates the tenant and system configuration in IQNECT, including tenant details, SSO configuration, the Codebeamer system entry, and the allowed origins or base URLs for the Codebeamer environment.
- The IQNECT administrator provides the customer with the credentials and configuration values required for the Codebeamer extension setup.
- The customer updates the Codebeamer application configuration and user permissions by following this guide.
- The IQNECT administrator and the customer complete the initial indexing setup and validate the installation together.
Prepare the IQNECT tenant and system #
Before configuring Codebeamer itself, the IQNECT administrator should create the tenant and the Codebeamer system entry in IQNECT. This is the step that generates the IQNECT clientId and clientSecret values needed by the Codebeamer extension.
- Create or open the IQNECT tenant.
- Create the Codebeamer system entry with the expected base URLs, authentication approach, and tunnel setting.
- Record or hand over the generated
clientIdandclientSecretso the customer can complete the Codebeamer application configuration. - After the local Codebeamer configuration is finished, return to the same IQNECT system entry to complete the user connection flow and configure the integration user.
Download the Codebeamer Extension #
This guide only covers the currently supported extension releases: 26.1.0, 26.2.1 and 26.3.0. Download the ZIP package that matches the IQNECT version you plan to use, then unzip it and select the JAR that matches your Codebeamer version.
| IQNECT Version | Extension Package |
|---|---|
26.1.0 | codebeamer-extension-26.1.0.zip |
26.2.1 | codebeamer-extension-26.2.1.zip |
26.3.0 | codebeamer-extension-26.3.0.zip |
Prerequisites #
Before configuring IQNECT for Codebeamer:
- You have Codebeamer administrator access.
- You have file-system access to the Codebeamer server.
- You have a maintenance window available, because the Codebeamer server must be restarted.
- Your IQNECT tenant has already been created and configured.
- You know the fully qualified domain name (FQDN) or base URL that IQNECT should use to reach the Codebeamer environment.
- You have identified the Codebeamer integration user that IQNECT will use for indexing, and this account has access to all content that should be indexed.
- Codebeamer Content Security Policy configuration allows
https://app.iqnect.ai. See the PTC Help Center Content Security Policy guidance. - The IQNECT networking requirements are fulfilled.
How the Codebeamer integration works #
The IQNECT Codebeamer extension is installed into your Codebeamer environment and adds the configuration required for Codebeamer to communicate with IQNECT. After installation:
- The extension JAR is loaded by the Codebeamer application.
- The IQNECT frontend bootstrap script is injected into Codebeamer when
uiBootstrapUrlis configured. - The extension exposes delegated-authorization endpoints used by IQNECT.
- The extension sends indexing events to IQNECT.
- The extension can optionally open an outbound tunnel relay connection.
After installation, Codebeamer can communicate with IQNECT and participate in cross-system lifecycle workflows.
Installing the IQNECT Codebeamer Extension #
Follow these steps to install the IQNECT Codebeamer extension.
Download and extract the package #
Download the extension ZIP package listed above and extract it. Then choose the JAR whose filename matches your Codebeamer version and required JDK. The files follow this pattern: iqnect-cb-extension-<IQNECT_VERSION>-cb<CODEBEAMER_VERSION>-jdk<JDK_VERSION>.jar. For example, for Codebeamer 3.1.x, use a file such as iqnect-cb-extension-26.3.0-cb3.1-jdk21.jar.
Copy the extension JAR to Codebeamer #
Copy the JAR that matches your Codebeamer version into the Codebeamer web application WEB-INF/lib directory. A typical location is:
<INSTALL_DIR>/tomcat/webapps/cb/WEB-INF/libWhen upgrading, remove any older iqnect-cb-extension-*.jar file before copying the new JAR.
Restart Codebeamer #
Restart the Codebeamer server after installing or upgrading the extension.
Configure Codebeamer Application Settings #
In Codebeamer, go to System Administration → Application Configuration and add or update the iqnox.iqnect object.
This step requires the clientId and clientSecret that were generated when the Codebeamer system entry was created in IQNECT.
{
  "iqnox": {
    "iqnect": {
      "clientId": "YOUR_CLIENT_ID",
      "clientSecret": "YOUR_CLIENT_SECRET",
      "queueMaxSize": 50,
      "queueMaxWait": 30000,
      "maxPayloadSize": 225280,
      "tokenUrl": "https://api.iqnect.ai/v26.2.1/oauth/token",
      "url": "https://api.iqnect.ai/v26.2.1",
      "uiBootstrapUrl": "https://app.iqnect.ai/cb/26.2/bootstrap.js",
      "tunnel": {
        "enabled": false,
        "url": "https://relay.iqnect.ai",
        "allowedBaseUrls": "https://YOUR_CODEBEAMER_BASE_URL,https://YOUR_INTERNAL_IDP_BASE_URL"
      },
      "oauth": {
        "clientId": "iqnect",
        "redirectUris": "https://api.iqnect.ai/systems/oauth2/callback, https://api.iqnect.ai/v26.2.1/systems/oauth2/callback",
        "scope": "iqnect",
        "tokenValidMinutes": 60,
        "renewalsEnabled": true
      }
    }
  }
}
If you are upgrading an existing environment, keep the existing clientId and clientSecret values unless IQNECT explicitly provides replacements.
Available configuration keys #
| Configuration Key | Required | Description |
|---|---|---|
clientId | Yes | OAuth client ID generated for the Codebeamer system. |
clientSecret | Yes | OAuth client secret generated for the Codebeamer system. |
tokenUrl | Yes | IQNECT OAuth token endpoint used by the extension. |
url | Yes | IQNECT API base URL used by the extension. |
uiBootstrapUrl | Yes for the frontend | Frontend bootstrap script injected into Codebeamer Classic and Codebeamer X. |
queueMaxSize | No | Maximum number of items batched before sending to IQNECT. |
queueMaxWait | No | Maximum batching wait in milliseconds. |
maxPayloadSize | No | Maximum payload size sent inline to IQNECT. For AWS-hosted IQNECT environments, use 225280. For local deployments, -1 can be used to disable the limit. |
tunnel.enabled | No | Enables the outbound IQNECT tunnel client in the Codebeamer extension. |
tunnel.url | When tunnel is enabled | Public relay base URL or the full relay WebSocket connect URL. |
tunnel.allowedBaseUrls | When tunnel is enabled | Comma- or newline-separated target base URLs allowed through the tunnel. Include the Codebeamer runtime base URL and any internal identity-provider base URLs needed for token and refresh flows. |
oauth.clientId | Yes for backchannel delegated | Fixed client ID used by the Codebeamer delegated authorization flow. The standard value is iqnect. |
oauth.redirectUris | Yes for backchannel delegated | Comma-separated allowlist of IQNECT callback URLs for the delegated authorization flow. |
oauth.scope | Yes for backchannel delegated | Scope value returned by the token endpoint. The standard value is iqnect. |
oauth.tokenValidMinutes | No | Validity period, in minutes, for Codebeamer delegated-authorization JWTs. |
oauth.renewalsEnabled | No | Enables the extension-driven delegated-auth renewal scheduler. |
When tunnel.enabled is true, the extension opens an outbound WebSocket connection to the relay and authenticates with the same OAuth client credentials configured by clientId, clientSecret, and tokenUrl. IQNECT sends Codebeamer API traffic and OAuth2 token or refresh calls through the relay only when the corresponding Codebeamer system in IQNECT also has tunnel mode enabled.
Review API throttling settings #
IQNECT uses the Codebeamer REST API. If your Codebeamer environment has API throttling enabled, make sure the configured capacity is sufficient for IQNECT traffic, especially during indexing and bulk reads. A commonly used example is:
"apiThrottling": {
  "urlPatterns": "/rest/**, /api/**",
  "bandwidthConfigs": [
    {
      "capacity": 100,
      "timeUnit": "SECOND"
    }
  ]
},
IQNECT versioning #
The IQNECT backend and frontend can be versioned independently when required. The url and tokenUrl settings can be pinned to versioned backend endpoints such as https://api.iqnect.ai/v26.2.1 and the matching token endpoint for that deployment.
The uiBootstrapUrl setting can also be pinned to a versioned frontend deployment. If you provide a specific versioned bootstrap URL, Codebeamer loads that frontend version. If you use a rolling URL such as https://app.iqnect.ai/cb/latest/bootstrap.js, Codebeamer always loads the latest published frontend in that channel. If uiBootstrapUrl is missing or empty, the IQNECT frontend is not injected.
Complete the IQNECT System Connection #
After the Codebeamer extension is installed and the local application configuration is complete, return to IQNECT and finish configuring the corresponding Codebeamer system. The IQNECT system configuration must match the Codebeamer environment, delegated authorization mode, and any tunnel settings that you configured in Codebeamer.
Choose the delegated authorization mode #
Codebeamer systems in IQNECT support two delegated authorization modes. Choose the mode that matches how users authenticate in your Codebeamer environment.
- Use Backchannel delegated when Codebeamer users authenticate locally in Codebeamer or through SAML 2.0 SSO. In this mode, IQNECT uses the delegated authorization endpoint exposed by the IQNECT Codebeamer extension.
- Use Standard OIDC/OAuth2 when your Codebeamer environment already relies on an OIDC or OAuth2 identity provider and you want IQNECT to use that identity-provider flow directly.
In practice, Backchannel delegated is the usual choice for Codebeamer environments using local authentication or SAML-based SSO, while Standard OIDC/OAuth2 is the right choice for environments already set up around a standard OIDC or OAuth2 provider.
| Setting | Required value or choice | Notes |
|---|---|---|
System Key | Short, unique value within the tenant | Use a stable identifier for the system. |
Credentials | OAuth2 | Required for the delegated-access model. |
API base path | Backend-reachable Codebeamer URL | This is the URL IQNECT uses to access Codebeamer. |
Browser base URL | End-user browser URL | In many environments this matches the API base path. |
Use tunnel relay | true or false | Set to true if the environment is not directly reachable from IQNECT, or if you want to force traffic through the relay. |
OAuth2 Mode | Backchannel delegated or Standard OIDC/OAuth2 | Use Backchannel delegated for local authentication or SAML 2.0 SSO. Use Standard OIDC/OAuth2 for OIDC-based SSO. |
ClientID | iqnect for Backchannel delegated | For Standard OIDC/OAuth2, use the value required by your identity provider. |
ClientSecret | Identity-provider specific when using Standard OIDC/OAuth2 | Not required for Backchannel delegated in this guide. |
Scopes | iqnect for Backchannel delegated | For Standard OIDC/OAuth2, use the scopes required by your identity provider. |
Authorization URL | https://CODEBEAMER_BASE_URL/cb/iqnect/oauth/authorize.spr for Backchannel delegated | Adjust the base URL to match your actual Codebeamer deployment path if it differs. |
Token URL | Identity-provider specific for Standard OIDC/OAuth2 | Not required in this guide for Backchannel delegated. |
Integration user | A user with access to all relevant items | Configure this in the Integration tab. This user is used for indexing. |
After saving the system configuration, click Connect and complete the delegated authentication flow for a real Codebeamer user account.
Configure the integration user for indexing #
IQNECT requires a dedicated integration user for indexing. This uses the same delegated authorization model as other connected users, but one connected user account is designated in IQNECT as the integration user for indexing.
- Use a dedicated service account instead of an individual administrator account.
- Grant access to all projects, trackers, items, and related content that should be indexed.
- Review the account whenever new projects, trackers, or item types are added to the indexing scope.
Appropriate Codebeamer User Permissions #
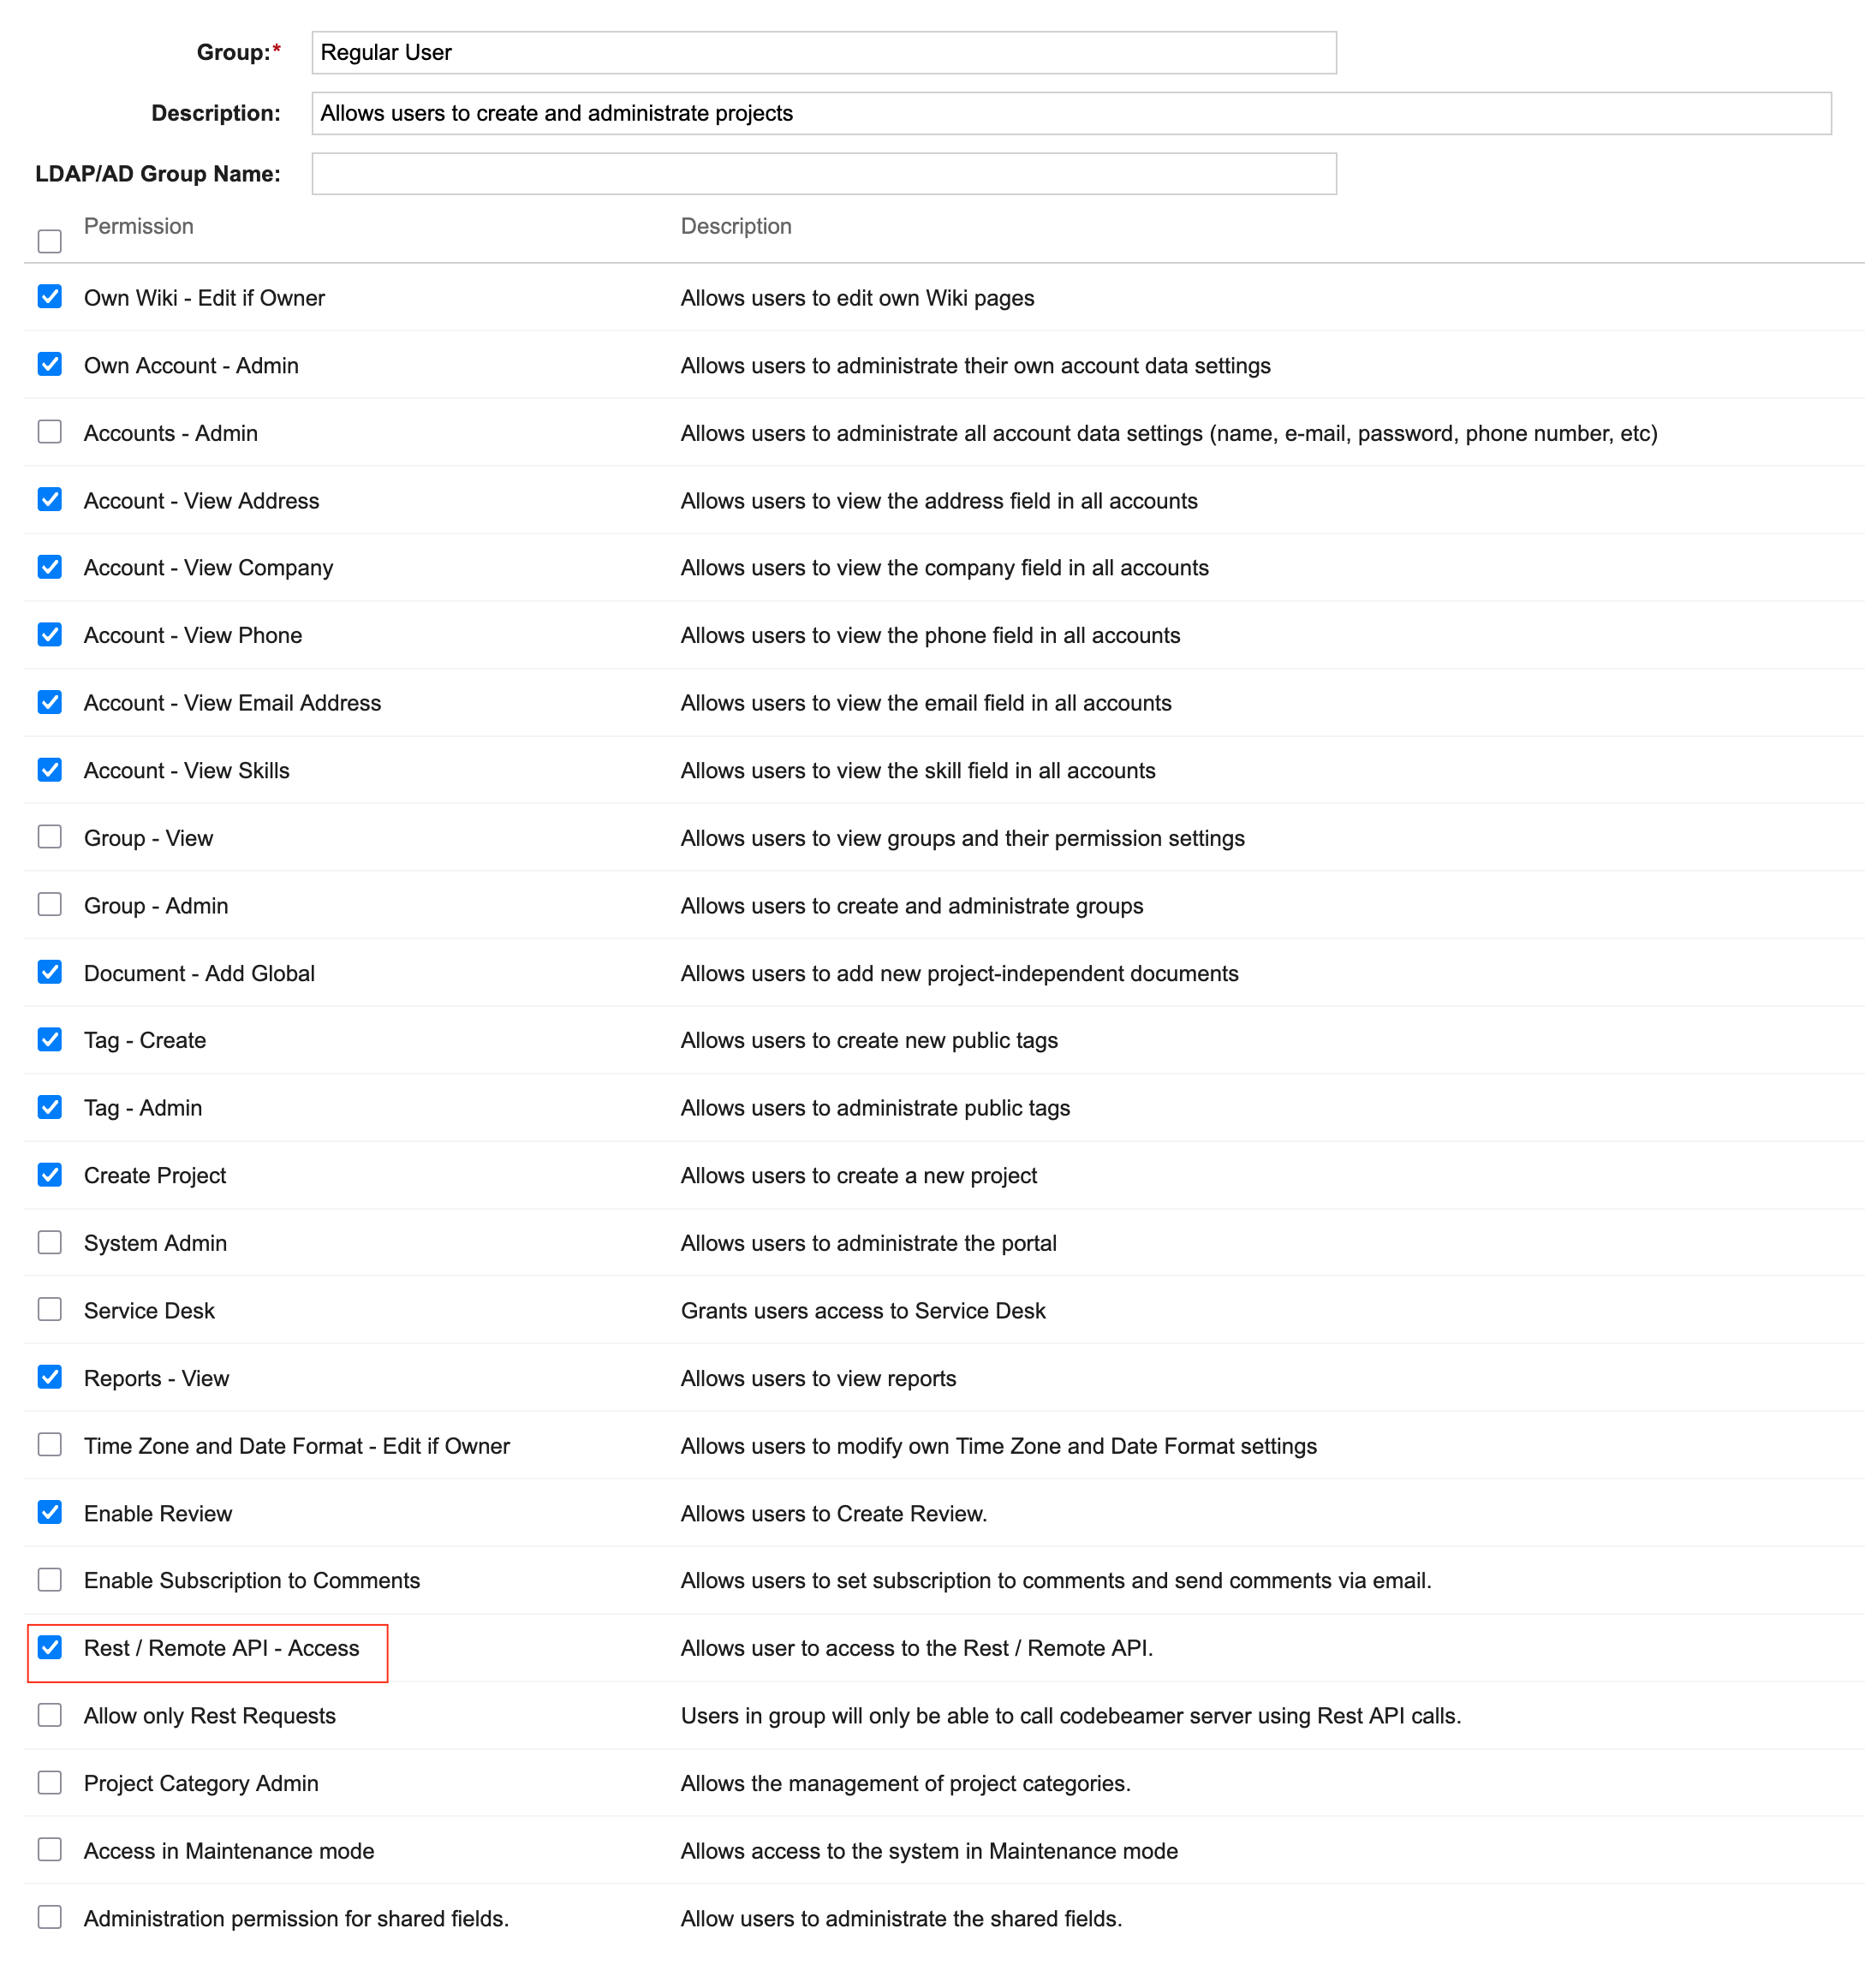
Each user who will use IQNECT must be a member of a user group that has the Rest /Remote API – Access permission.
For many environments, this means updating the Regular User group or the equivalent group used by standard IQNECT users.
Verifying the Installation #
Use the following checks after configuration:
- Confirm that the Codebeamer server restarted successfully after the extension was installed.
- Open Codebeamer and confirm that the IQNECT button or entry point is visible and functional.
- Confirm that the configured frontend version is the one you expect.
- In IQNECT, confirm that the Codebeamer system appears under connected systems.
- Click Connect and confirm that the delegated authentication flow completes successfully.
- Confirm that the system status indicates that the system is connected.
- Confirm that the configured integration user is saved in the
Integrationtab. - Confirm that IQNECT can fetch full item contents for indexing through the integration user.
Results and next steps #
You have successfully installed and configured the IQNECT Codebeamer extension.
Codebeamer can now connect to IQNECT and participate in semantic search, lifecycle intelligence, cross-system traceability, and engineering collaboration workflows.
Future IQNECT updates can be deployed by installing an updated IQNECT Codebeamer extension package, updating the Codebeamer application configuration if required, and repeating the validation steps.
