
Overview #
This document describes how Windchill PLM can be set up to connect with IQNECT for semantic search, lifecycle intelligence, and cross-system traceability. Generally, these steps need to be completed for a successful setup:
- Environment discovery, prerequisites.
- Prepare the IQNECT tenant and Windchill system entry so the required IQNECT credentials can be generated.
- Configure Windchill for OAuth Delegated Authorization.
- Install the IQNECT Windchill Extension within the Windchill PLM server.
- Configure Windchill with the IQNECT credentials and settings.
- Return to IQNECT to complete the Windchill system connection, including delegated user connection and the integration user used for indexing.
IQNECT works by accessing the Windchill REST Services API by using delegated authorization. This ensures that users only see in IQNECT the data that they can already see in Windchill. Windchill remains the source of truth for access control, and IQNECT respects that access model. This means that each IQNECT user must connect their own Windchill account.
The extension is installed within your Windchill environment and enables communication between Windchill and IQNECT. Once installed, administrators can configure which IQNECT environment or version should be loaded through Windchill’s Preference Management interface.
Prepare the IQNECT tenant and system #
Before configuring Windchill itself, the IQNECT administrator should create the tenant and the Windchill system entry in IQNECT. This is the step that generates the IQNECT clientId and clientSecret values needed by the Windchill extension preferences.
- Create or open the IQNECT tenant.
- Create the Windchill system entry with the expected base URLs and connectivity approach.
- Record or hand over the generated
clientIdandclientSecretso the customer can complete the Windchill preference configuration. - After the local Windchill configuration is finished, return to the same IQNECT system entry to complete the user connection flow and configure the integration user.
Download the Windchill Extension #
Download the IQNECT Windchill Extension package that matches the IQNECT version you plan to use. Additional versions can be listed here as they become available.
| IQNECT Version | Extension Package |
|---|---|
26.2.1 | iqnect-windchill-extension-26.2.1.zip |
26.3.0 | iqnect-windchill-extension-26.3.0.zip |
Prerequisites #
Before configuring IQNECT for Windchill:
- You have administrator access to the Windchill server.
- You have access to the Windchill file system.
- You have access to the Windchill Shell.
- You have received the IQNECT Windchill Extension package from the IQNECT team.
- Your IQNECT tenant has already been created and configured.
- You have identified the Windchill integration user that IQNECT will use for indexing, and this account has access to all content that should be indexed.
- You know the fully qualified domain name (FQDN) or base URL that IQNECT should use to reach the Windchill environment.
- The IQNECT networking requirements are fulfilled.
Configure Windchill OAuth Delegated Authorization #
Before connecting Windchill to IQNECT, make sure Windchill is configured for OAuth Delegated Authorization. IQNECT depends on this so that it can call Windchill on behalf of signed-in users instead of using a shared end-user credential.
Use the PTC Help Center article Configure OAuth Delegated Authorization as the authoritative reference for the exact Windchill steps and version-specific property names.
Follow the PTC guidance for the full configuration details. For IQNECT, the important point is that Windchill must be configured so IQNECT can use delegated authorization for user-driven access to Windchill REST APIs.
The same delegated authorization model is also used for the integration user described later in this guide. The difference is that one connected user account is designated in IQNECT as the integration user for indexing.
How the Windchill integration works #
The IQNECT Windchill Extension is installed into your Windchill environment and adds the configuration required for Windchill to communicate with IQNECT. During installation:
- The extension package is deployed into the Windchill customization directory.
- Windchill configuration files are updated.
- IQNECT preference definitions are loaded into Windchill.
- The Windchill server is restarted.
- IQNECT configuration becomes available through Preference Management.
After installation, Windchill can communicate with IQNECT and participate in cross-system lifecycle workflows.
Installing the IQNECT Windchill Extension #
Follow these steps to install the IQNECT Windchill Extension. For the Windchill CCD tooling itself, refer to the PTC Help Center documentation for the CCD customization tools workflow.
Download the extension package #
Download the latest IQNECT Windchill Extension package from this support page.
The package contains the files required to deploy the IQNECT Windchill integration into your Windchill environment.
Extract the package #
Extract the package into your Windchill customization root directory.
Example:
C:\PTC\customizationThe extracted files will be used during deployment.
Open the Windchill customization tools #
Open a Windchill Shell and navigate to:
<WT_HOME>/bin/customizationToolsConfigure the customization source directory #
Open:
customizationTools.propertiesLocate:
wt.customizationSource.dir.pathUpdate the value to point to the directory where the IQNECT extension package was extracted.
Example:
wt.customizationSource.dir.path=C:\\PTC\\customizationSave the file.
Deploy the customization #
From the Windchill Shell, run:
ant deployThis applies the required configuration changes to the Windchill environment.
Load IQNECT preference definitions #
After deployment completes, run:
ant load.dataThis loads the IQNECT preference definitions into Windchill.
Restart Windchill #
Restart the Windchill server by running:
ant wnc.restartThe installation is now complete.
Configuring IQNECT settings #
After installation, configure the IQNECT integration settings.
Open Preference Management #
In Windchill, navigate to:
Browse → Site → Utilities → Preference Management
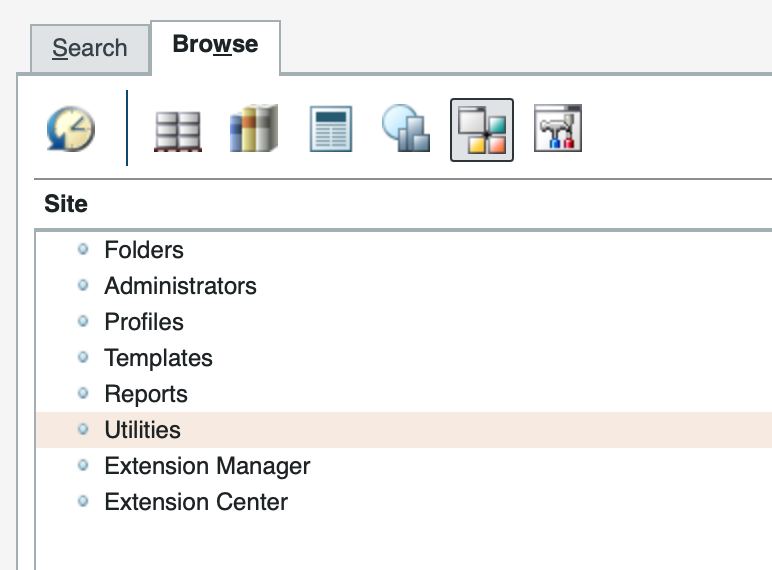
If the installation was successful, an IQNECT section will be available.
Open the IQNECT preferences #
Expand the IQNECT preference category.
The preferences allow administrators to configure how Windchill connects to IQNECT.
All IQNECT preferences are site-scoped under the IQNECT category and are used by the server-side Windchill extension.
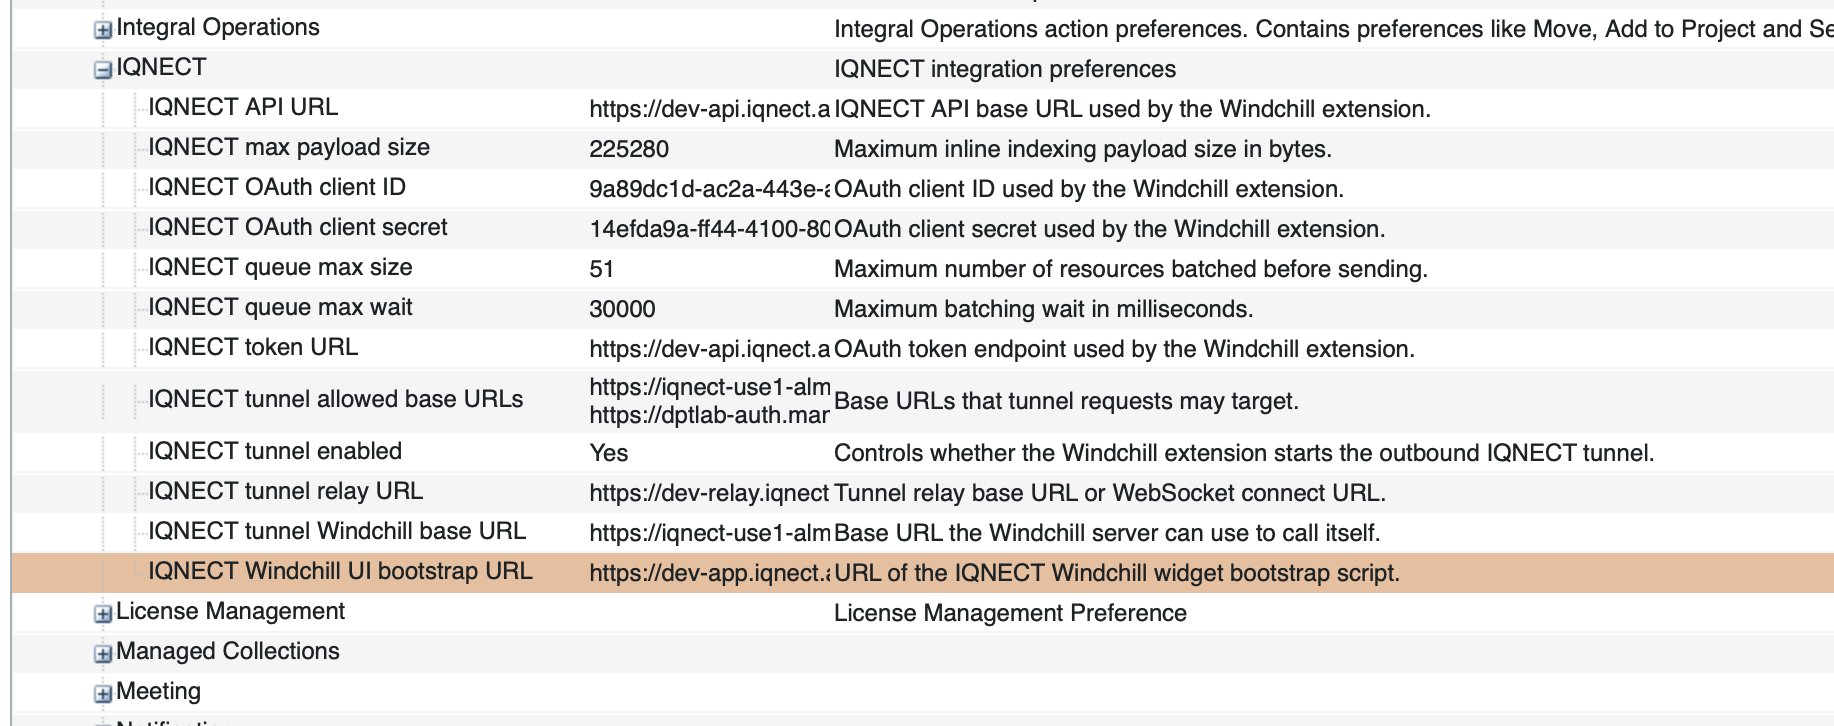
These Windchill preferences control the extension installed inside Windchill. You must also configure the corresponding Windchill system in IQNECT so that delegated user access and indexing can work end to end.
This step requires the clientId and clientSecret that were generated when the Windchill system entry was created in IQNECT.
Review the server-side IQNECT client settings #
The IQNECT preference category includes the settings that control how the Windchill extension loads the UI, authenticates to IQNECT, sends indexing events, and optionally opens the outbound tunnel relay connection.
| Display Name | Preference Key | Required | Default Value | Description |
|---|---|---|---|---|
| IQNECT Windchill UI bootstrap URL | /ai/iqnect/integration/windchill/uiBootstrapUrl | No | https://app.iqnect.ai/wc/bootstrap.js | URL of the IQNECT Windchill widget bootstrap script. |
| IQNECT API URL | /ai/iqnect/integration/windchill/url | Yes | https://api.iqnect.ai | IQNECT API base URL used by the Windchill extension. |
| IQNECT OAuth client ID | /ai/iqnect/integration/windchill/clientId | Yes | empty | OAuth client ID used by the Windchill extension. |
| IQNECT OAuth client secret | /ai/iqnect/integration/windchill/clientSecret | Yes | empty | OAuth client secret used by the Windchill extension. |
| IQNECT token URL | /ai/iqnect/integration/windchill/tokenUrl | Yes | https://api.iqnect.ai/oauth/token | OAuth token endpoint used by the Windchill extension. |
| IQNECT tunnel enabled | /ai/iqnect/integration/windchill/tunnelEnabled | No | false | Controls whether the Windchill extension starts the outbound IQNECT tunnel. |
| IQNECT tunnel relay URL | /ai/iqnect/integration/windchill/tunnelUrl | When tunnel is enabled | empty | Tunnel relay base URL or WebSocket connect URL. |
| IQNECT tunnel allowed base URLs | /ai/iqnect/integration/windchill/tunnelAllowedBaseUrls | When tunnel is enabled | empty | Base URLs that tunnel requests may target. Include the Windchill application URL as seen by the MethodServer and any internal identity-provider URLs needed for OAuth2 token and refresh flows. |
| IQNECT queue max size | /ai/iqnect/integration/windchill/queueMaxSize | No | 50 | Maximum number of resources batched before sending. |
| IQNECT queue max wait | /ai/iqnect/integration/windchill/queueMaxWait | No | 30000 | Maximum batching wait in milliseconds. |
| IQNECT max payload size | /ai/iqnect/integration/windchill/maxPayloadSize | No | 225280 | Maximum inline indexing payload size in bytes. |
If tunnel mode is enabled, make sure the tunnel base URLs are configured carefully. This should include the Windchill base URL or FQDN as seen by the MethodServer, and any internal identity-provider endpoints that must be reachable during OAuth token and refresh operations.
If tunnel mode is not enabled for the system in IQNECT, backend requests continue to use the configured Windchill and identity-provider URLs directly, even if the extension is capable of opening an outbound tunnel.
IQNECT versioning #
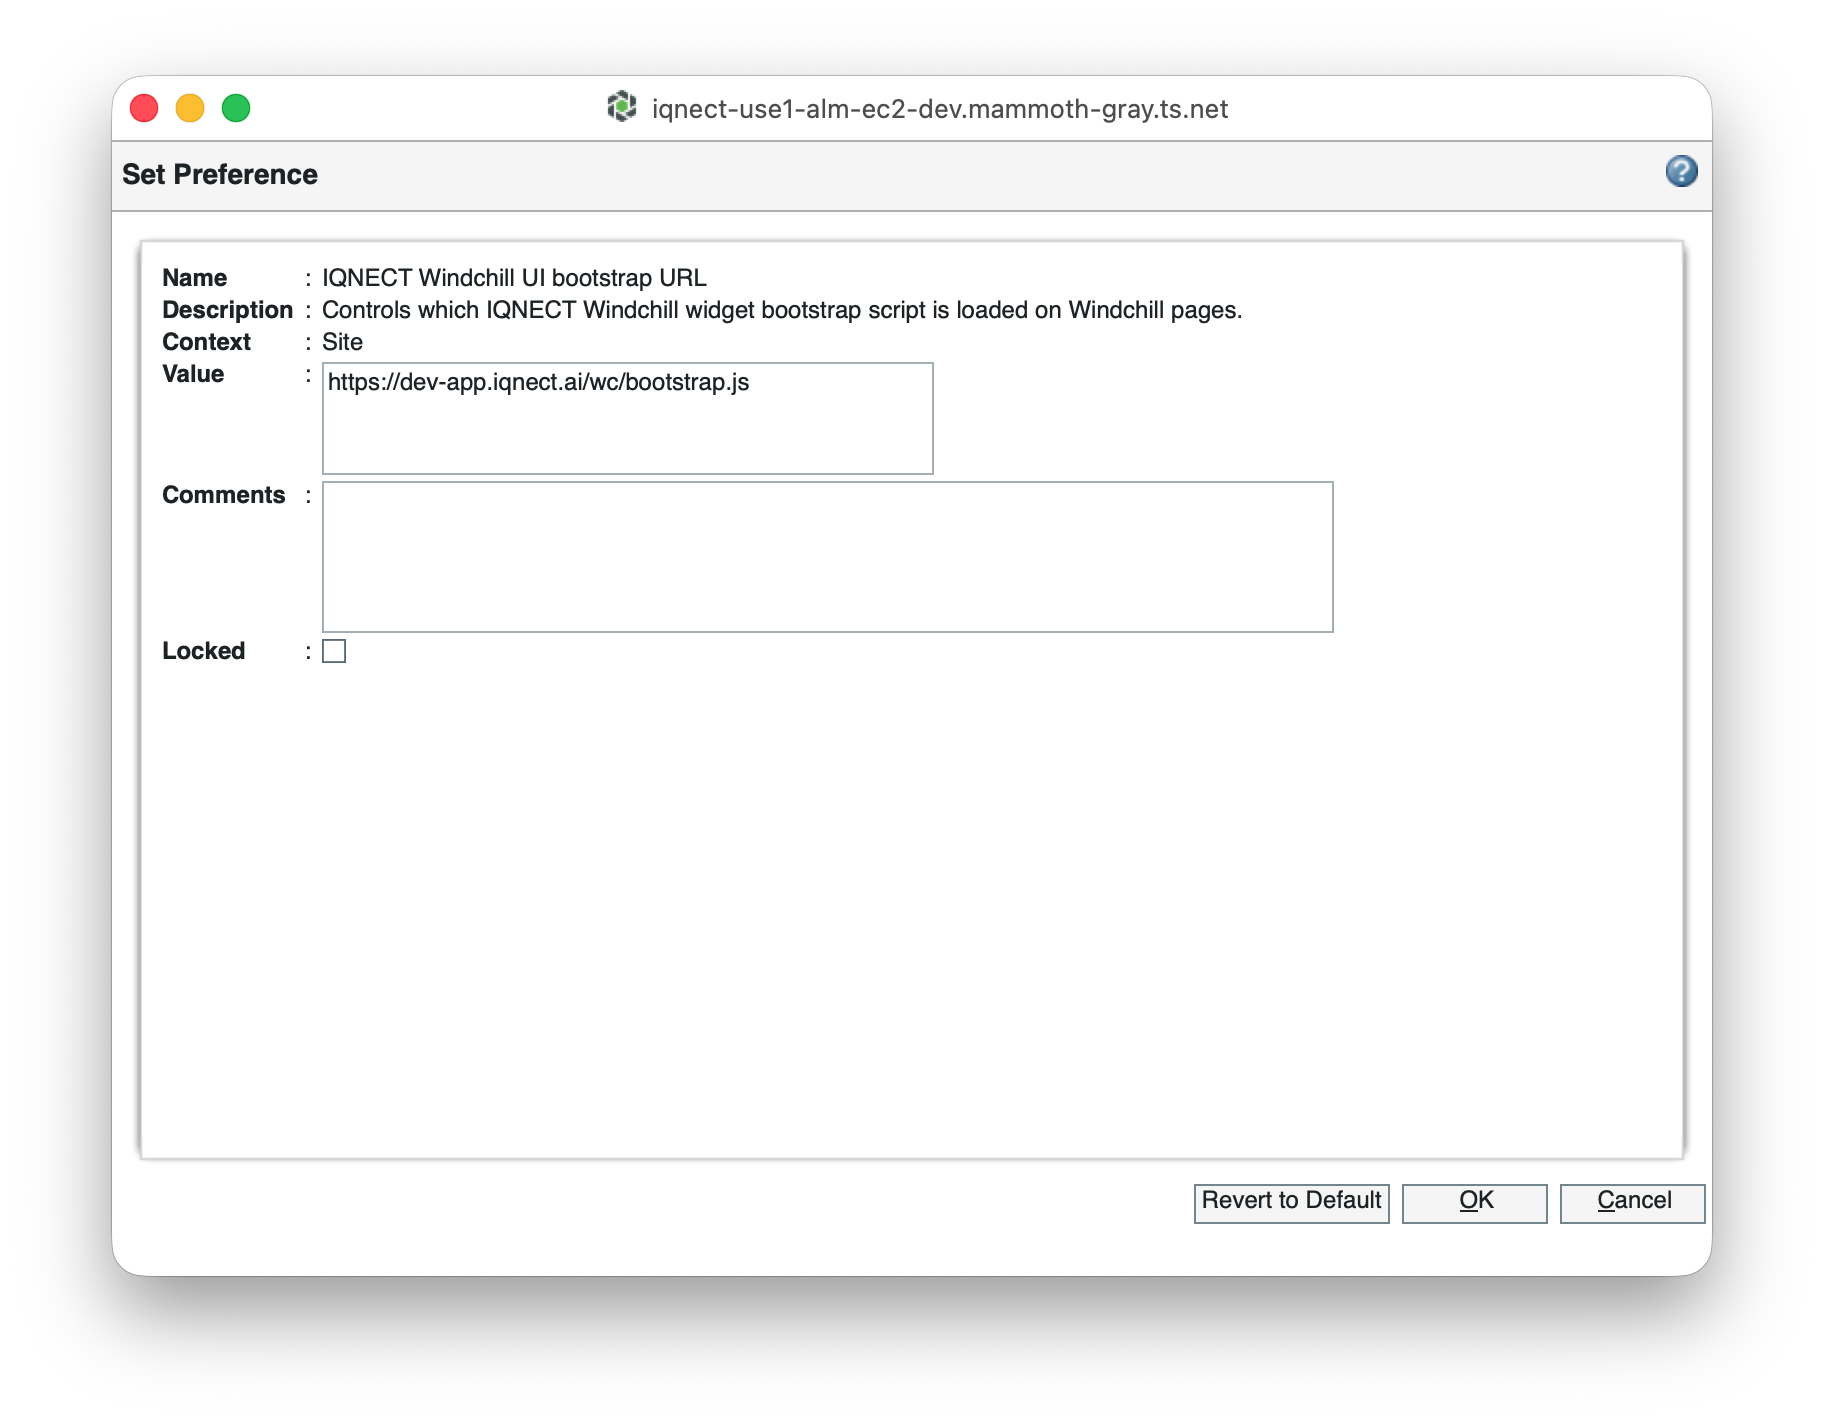
The IQNECT backend and frontend can be versioned independently when needed. The IQNECT API URL and IQNECT token URL preferences can be pinned to versioned backend endpoints such as https://api.iqnect.ai/v26.2.1 and the matching token endpoint for that deployment.
The IQNECT Windchill UI bootstrap URL can also be pinned to a versioned frontend deployment. If you specify an explicit versioned bootstrap URL, Windchill loads that frontend version. If this preference remains on the default unversioned bootstrap URL, the frontend version follows the IQNECT tenant version configured in the IQNECT admin UI.
Complete the IQNECT system connection #
After the Windchill extension is installed and the local Windchill preference configuration is complete, return to IQNECT and finish configuring the Windchill connected system with the same base URL, OAuth client details, authorization URL, token URL, and scope that were prepared during the delegated authorization setup.
The Windchill system should be configured with the OAuth2 details exposed by your Windchill delegated-authorization setup.
| Setting | Required value or choice | Notes |
|---|---|---|
System Key | Short, unique value within the tenant | Use a stable identifier for the system. |
Credentials | OAuth2 | Required for the delegated-access model. |
API base path | Backend-reachable Windchill URL | This is the URL IQNECT uses to access Windchill. |
Browser base URL | End-user browser URL | In many environments this matches the API base path. |
Use tunnel relay | true or false | Set to true if the environment is not directly reachable from IQNECT, or if you want to force traffic through the relay. |
ClientID | Value configured in Windchill delegated authorization | This must match the Windchill OAuth client configuration. |
ClientSecret | Value configured in Windchill delegated authorization | Use the client secret associated with that Windchill OAuth client when required. |
Scopes | Scope configured for Windchill delegated authorization | This must match the scope registered in Windchill and the authorization server or identity provider. |
Authorization URL | Windchill delegated authorization endpoint | Use the authorization endpoint exposed by your Windchill OAuth delegated-authorization setup. |
Token URL | Windchill delegated token endpoint | Use the token endpoint exposed by your Windchill OAuth delegated-authorization setup. |
Integration user | A user with access to all relevant items | Configure this in the Integration tab. This user is used for indexing. |
Then complete the user connection flow from IQNECT so that delegated access is validated with a real Windchill user account.
Configure the integration user for indexing #
In addition to delegated user access, IQNECT requires a dedicated integration user (service account) for indexing. This is required because the indexing pipeline fetches the full Windchill object content after it receives indexing events.
Configure this account in the Windchill system’s Integration tab in IQNECT. The account should be a non-personal service account and must have read access to all Windchill content that should be searchable in IQNECT.
- Use a dedicated service account instead of an individual administrator account.
- Grant access to all products, libraries, folders, and object types that should be indexed.
- Review the account whenever new Windchill domains or object types are added to the indexing scope.
This account does not replace delegated user authorization. Interactive IQNECT usage still runs under each user’s own Windchill permissions.
Configure IQNECT Controls Properties #
IQNECT uses a custom property to store and display IQNECT controls information within Windchill objects.
The property must be created and added to the appropriate Windchill object types before IQNECT controls can be displayed.
Create the IQNECT Controls property #
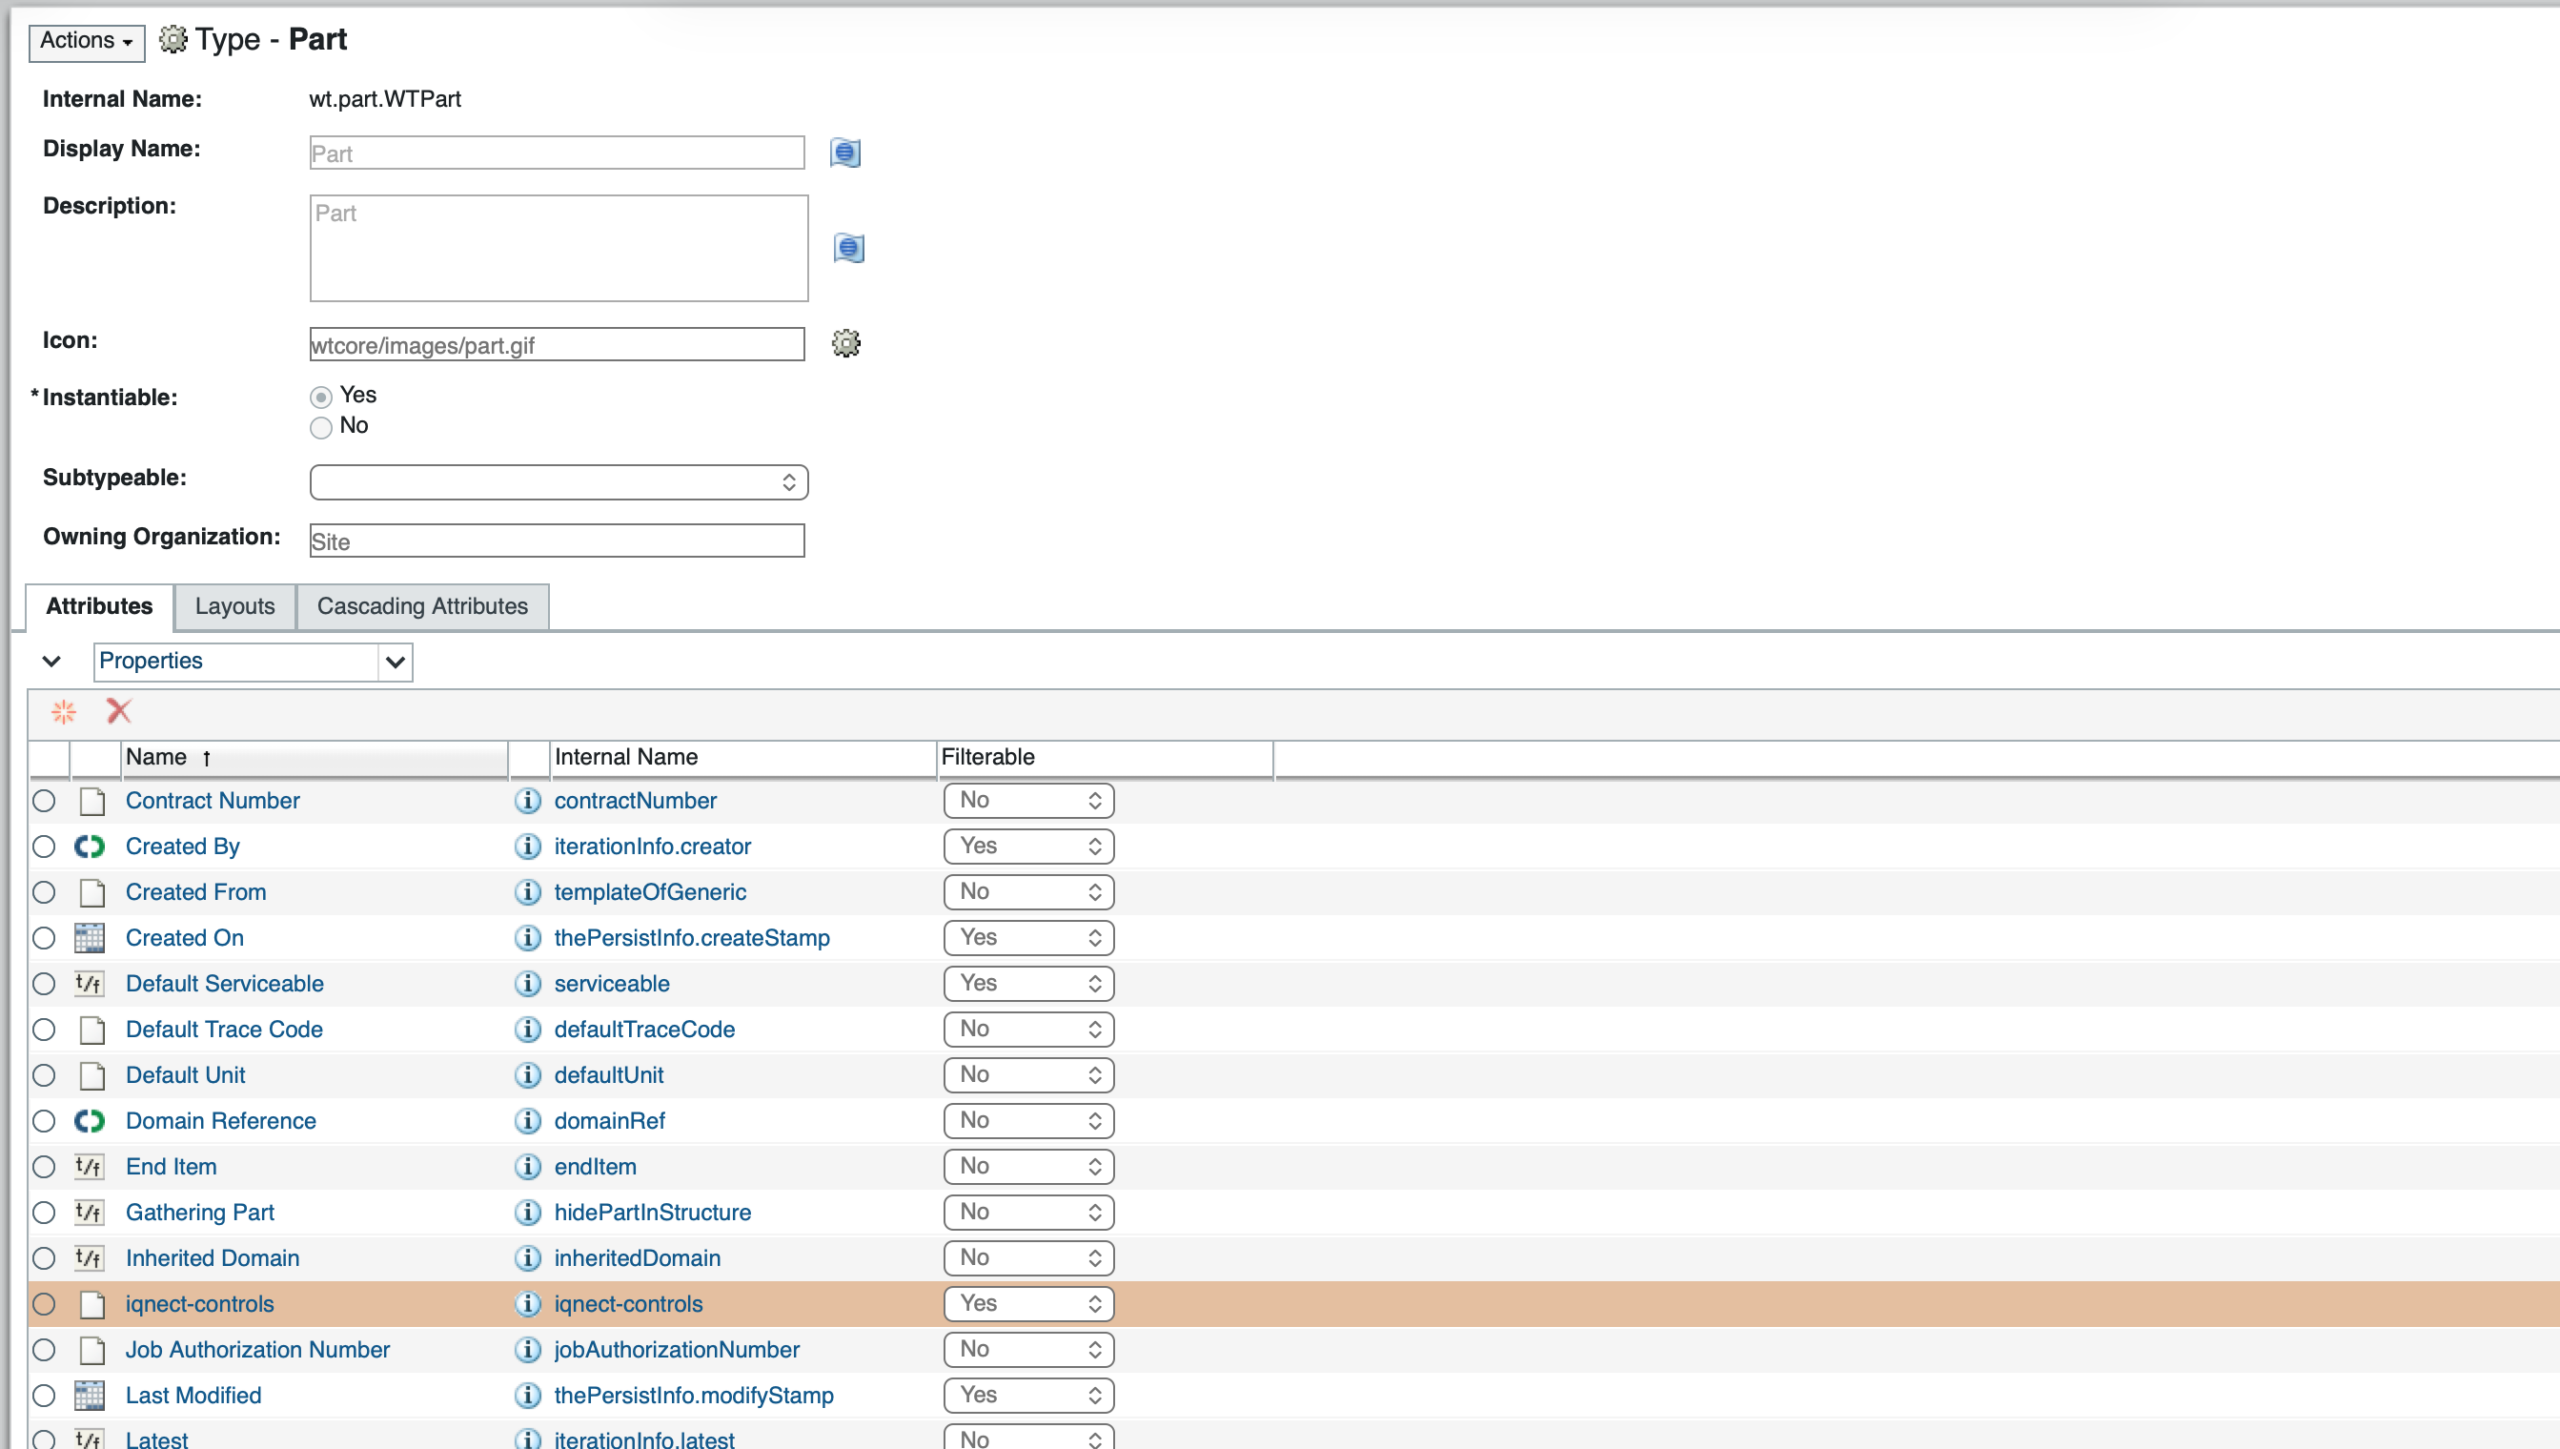
Open Types and Attributes Manager and create the IQNECT controls property on the object types where you want the column to appear. The extension supports both iqnect-controls and iqnect_controls, but use iqnect_controls as the recommended name for new configuration.
Add the property to:
- WTPart
- WTDocument
- EPMDocument
Resolve property creation errors #
If Windchill raises a database error while creating the local property, first create a global property named iqnect_controls, then create the local property for each object type and map each local property back to that global definition.
Configure table views #
Add the iqnect_controls property as a column in any Windchill tables where IQNECT controls information should be displayed. Common locations include:
- WTPart tables
- WTDocument tables
- EPMDocument tables
Configure the display name #
You may use any display label that fits your naming standards. Typical examples are:
- IQNECT Controls
- Controls
- AI Controls
- Lifecycle Controls
The display name only affects how the column appears within Windchill and does not impact IQNECT functionality.
Verifying the installation #
Follow these steps to confirm the integration is working correctly.
Confirm the IQNECT preference category exists #
Navigate to:
Browse → Site → Utilities → Preference Management
Verify that the IQNECT preference category is visible.
Verify the Bootstrap URL #
Open the IQNECT preferences and verify that the Bootstrap URL contains the expected value.
Validate the integration #
Open Windchill and access an area where the IQNECT integration is available.
Verify that:
- IQNECT loads successfully.
- The IQNECT menu and controls are displayed.
- No connectivity or configuration errors are shown.
- The delegated Windchill connection in IQNECT completes successfully for a real user account.
- The configured integration user can access the Windchill content that must be indexed.
Results and next steps #
You’ve successfully installed and configured the IQNECT Windchill Extension.
Windchill can now connect to IQNECT and participate in semantic search, lifecycle intelligence, cross-system traceability, and engineering collaboration workflows.
Future IQNECT updates can be deployed by installing an updated IQNECT Windchill Extension package and repeating the deployment process.
